|
Menu:
| Introduction |
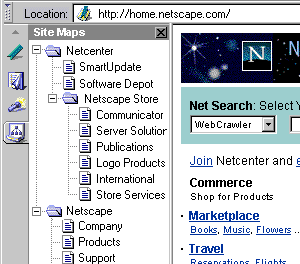
| The next-generation browser from Netscape, Communicator 5.0, will provide
users with a new feature that displays a map of the site that they're browsing. The
developer of the site must create a special site map file and provide a link to it within
their home page. When a visitor comes to the site with a Communicator 5.0 browser, an icon
will appear on the toolbar that allows the user to view the map. The map file must be
created in the Resource Definition Format (RDF) and uploaded to your Webserver. As a
Webmaster, Tetranet's Wisebot makes it simple for you to support this exciting new
feature. Wisebot will scan your site and automatically create an RDF site map file for
you. Wisebot also makes it possible to edit the map and upload it to your Web server with
little effort. |
 |
How to install the RDF site map on your site
After you have scanned your site, Wisebot will automatically create a RDF file
and save it in the default Wisebot directory. Install the RDF file at your site by
doing the following:
- Customize the map by selecting Edit button on the toolbar.
- Upload the RDF map file to your Web server by manually copying the .rdf file or by
selecting the Publish button on the toolbar.
- Once the .rdf file has been saved to your Web server, you'll need to create a link to
this file from your Home page. To do this, add the following line in the <HEAD> tag
of your home page's HTML code:
<HEAD>
<LINK REL=sitemap SRC="/rdf/sitemap.rdf#root" NAME="Your Company
Name" TYPE="text/rdf">
</HEAD>
Note that in this is only an example. You'll need to change the path to the RDF file to
the location on your own site. Also, change the "Your
Company Name" to your own site's name.
Once you have completed these steps, any Communicator 5.0 browser will automatically
display the map when browsing pages on your site. If the user moves from the Home/Front
page to another page on the site, the map icon on the toolbar of the browser will still be
displayed. However, if the user enters the site from a page that doesn't contain the
"<LINK REL=sitemap..." reference, the map will not show up. You can solve
this problem by adding this statement to all the pages on your site.
Editing the Site Map
You can use the site map that Wisebot automatically creates or customize it by
selecting Edit button on the toolbar. In the editor you can add or delete nodes, change
the titles for your URLs and assign an icon to your map. The icon will show up on the
vertical toolbar in Communicator when your site is loaded. For more information on
Editing, press the Help button in the Editing window.
Publishing and updating the map
Upload the RDF map file to your Web server by manually copying the .rdf file or
by selecting the Publish button on the toolbar. If you use the publish feature,
Wisebot will upload the "yoursite.rdf" file from the Wisebot directory on your
local PC to your Web server.
To update the map, you can re-scan your site or manually edit the map using Wisebot
Edit feature. After the changes have been made, you will then need to re-publish the RDF
file to your server.
Creating maps for Internet Explorer and older versions
of Netscape
For Internet Explorer and Netscape Navigator 4.0 or less, you will have to use
Wisebot's Java version of the site map. See the on-line help for more informatio on how to
publish the Java version of the site map.
Getting more information on RDF
|